Posts Tagged ‘behind the scenes’

Little Red Ride


Above is a behind the scenes video for a fairy-tale themed photograph I took of my red Ford Focus (2011, Titanium). The video explains how I turned the Little Red Riding Hood idea into an image, from the two-hour shoot with Olivier Kerschen to the six-hour editing process in Lightroom and Photoshop. The two photographs below show an unedited picture with nothing but ambient light and the final edited image.

The same video is also available in Luxembourgish.


Zazu

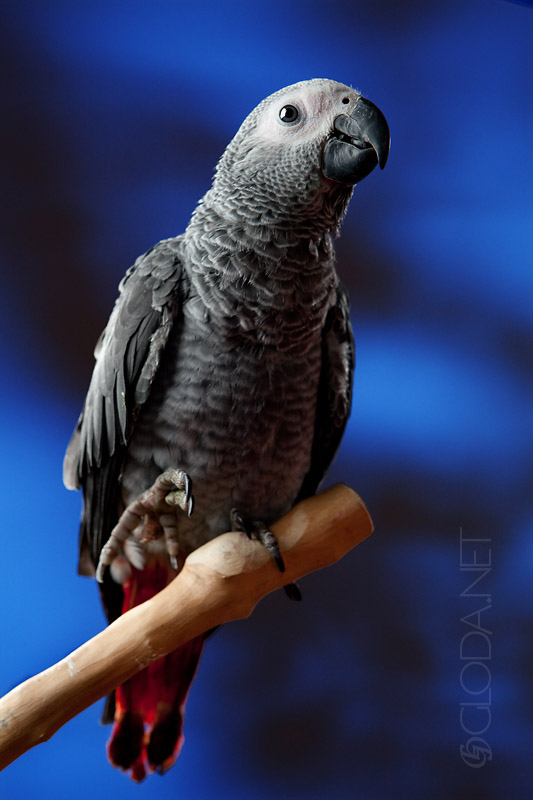
Meet Zazu, Alison’s African Grey parrot. She’s a crazy one. (Zazu, not Alison.) When I took this photo, Zazu was about three months old. You may already have seen this photo in my PAD collection, but I wanted to show you a bit of behind the scenes information from when I took this. The setup shot below should give you a pretty good idea of how I managed to light Zazu in her ‘natural habitat’.
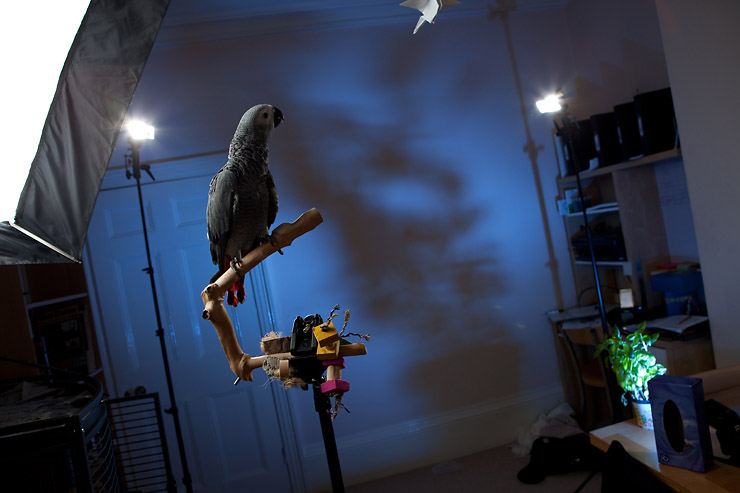
So, first of all, for Zazu to be sitting somewhere outside her cage with not too much clutter around her, I first set up a lightstand with a superclamp, which in turn held one of her perches in place. To keep her occupied we let her play with a pen top, one of her favourite toys.
The lights are all triggered using Canon’s ETTL system. An on-camera ST-E2 sent out the signal to the slaves, which were all set to manual mode. The lights on the left and right in the back are 430EX Speedlights with my DIY snoots on them. (The snoots are cookie boxes lined with gaffer tape.) The snoots shape the light into a tight beam, to reduce flare to a minimum and to avoid the light bouncing around the room.
The softbox on the left is the Westcott Apollo set with a 580EX inside it. It’s rotated towards the camera so as to avoid it spilling light onto the wall in the backround. On the table on the right side is another 580EX. This one is flagged by a tissue box (whatever comes handy, really!) and I put a CTB gel on it in order to end up with a strong blue background. I also didn’t want the background to be homogenous, so I placed a basil plant in front of the light. The shadows from the plant add a bit of interest to the background.
Oh and the white thing floating at the top of the image which Zazu is staring at in the setup shot is an origami crane. She has since taken care of it.


Photo Shopping

[kml_flashembed fversion=”8.0.0″ movie=”http://gloda.net/pb/20090921trolley/2009.swf” targetclass=”flashmovie” publishmethod=”static” width=”740″ height=”547″ wmode=”transparent” base=”.” /]
Last week I posted a bit of behind the scenes information about the setup for the picture Zombies at an Airport. This time I’m publishing the original image along with the finished photo so that you can see what can be done to give a photo some flavour.
I actually shot this for a competition on Photogen, but then it turned out I had misinterpreted the topic, so I submitted something else instead. If it wasn’t for the competition which requires anonymity though I might have taken the picture the other way around, showing myself pushing the trolley.
I borrowed Alison’s EF 17-35 2.8L lens for this. (I don’t have a proper wide angle lens for the 5DMkII yet. I’m hoping for Canon to release the 14-24 2.8 L that’s being rumoured about this year.) The camera is mounted to the trolley’s handlebar using a Manfrotto superclamp. I dialed the camera to ISO100 to get the best possible image quality, and then closed the aperture down so that I could get a long enough exposure time. In this case I ended up with f/9 and 1,6 seconds.
The post-processing should be pretty self-explanatory from the pictures. I fixed a highlight from a ceiling light with the clone stamp, then I used Curve and Hue/Saturation/Lightness adjustment layers to add contrast and shift colours the way I wanted them. The advantage of using adjustment layers to do this is that you can re-adjust them later if you change your mind, and that you can easily apply layer masks so as to apply the effect of an adjustment layer to a specific area of the image only. As you can see it’s nothing too fancy, but I think it makes all the difference between a picture that looks fairly flat and one that pops.
In case you’re wondering what I was shopping for (I didn’t go to our local supermarket just for the photo), it’s Spicy Moroccan Stewed Fish with Couscous from Jamie Oliver’s Ministry of Food. Lots of great recipes without too much fuss in there. And some cool and helpful pictures by David Loftus and Chris Terry (although I think they went a bit overboard with the tonemapping on some portraits).


Zombies at an Airport

The sequel to Snakes on a Plane

The sequel to Snakes on a Plane


A bit of behind the scenes information about my PAD for September 16th 2009. The initial concept for the picture was to have a hand come out of a suitcase, and to add some visual drama by putting a lightsource inside the suitcase too.
I placed one of my flashes inside the suitcase. Because I wanted the light to spread as evenly as possible, I placed the flash inside a clear plastic tube (the ones you get when you buy 100 DVD-Rs together… I burn every RAW file I might ever need to get back to on DVD. Twice.) Since the lid would be closed, Canon’s ETTL triggerism functionality wouldn’t work here – it needs line of sight. A perfect opportunity for my new PocketWizard set then. The flash and the FlexTT5 fitted inside the tube easily. A stofen omnibounce-type diffuser spread the light out a bit more. The settings on this flash were 32mm at 1/2 power.
The flash on the Manfrotto Nano 005B lightstand, which provides the light outside the suitcase is still triggered via Canon’s ETTL. It’s zoomed in to 100mm, at 1/2 +0,7 power. A full CTB (Color Temperature Blue) gives the light a blue cast that contrasts with the neutral light from the suitcase. To limit the area lit by this flash to a small surface, I added a DIY straw snoot to it. That way the beam behaves more like a spotlight.
I took one picture with just the suitcase, and another with the same settings (Canon 5DMkII, ISO100, f/9, 1/200) where my sister put her arm in from one side and out at the front again.
In Photoshop I layered the two photos over each other. Now all I had to do was mask Carmen out of the photo so that only her hand would remain visible.